Boots
The
boots in this lesson are not too hard to make. They are low ankle boots
with a part leg. |
 |
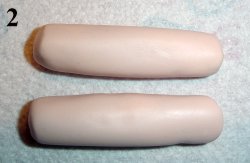 |
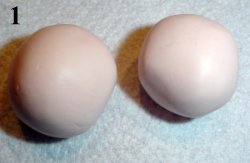
| Condition the fimoclay well before starting and make 2 equal sized balls. (pict. 1). Roll them into 2 cylinder shaped rolls of fimo, 2.5 inch long and about 0.8 inch thick (pict. 2). | |
 |
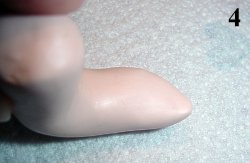 |
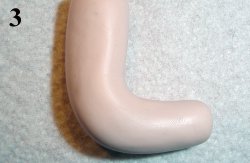
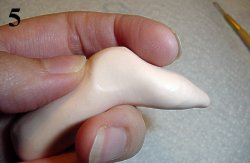
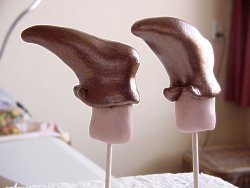
| Bend the rolls of clay in a 90 degree angle (pict. 3) Be careful not to sculpt it into a hockey stick shape. If it does look like this you can add some extra clay. ;o) Make the shape of the foot thinner to the end by pushing it more flat towards the 'toes'. Sculpt the end of the boot (the area of the big toe) into a pointy end (pict. 4). Push the point a little upwards. Be sure you're making a left and right boot, 'cause before you realize you'll have two of the same . ;-) | |
 |
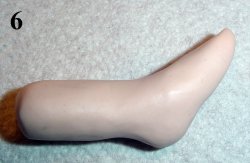 |
| At this moment the back of the lower leg/foot is still straight. So it is time to make the heel of the foot. Push/smear some clay from under the foot backwards (towards the heel) and push/smear some clay from the lower leg down (towards the heel) (pict. 5). This way you'll get more clay on the heel area. Smooth the clay and make the heel round. If the boot is a bit too thick around the ankle, you can hold it between thumb and point finger and carefully roll it back and forth. The boot should now look something like pict. 6. | |
 |
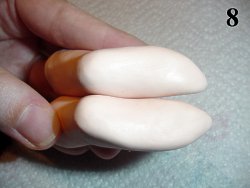 |
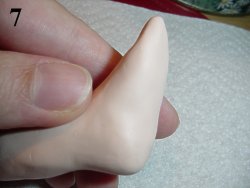
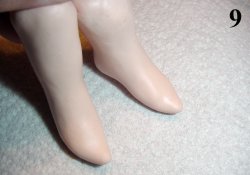
| On the inside of the boot's foot, you make a little pit using your thumb (pict. 7), the shape of the boot will look more natural like this. Work simultaneously on both boots so they will be the same size and shape. Compare them often to see if they are the same size (pict. 8 + 9). | |
 |
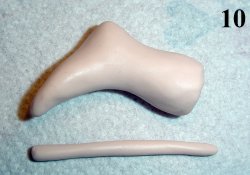 |
| Place the boots next to each other, to see how they look and correct (if necessary) the pose. (pict. 9). Now make a thin roll of fimo that's long enough to fit around the leg. (pict. 10). | |
 |
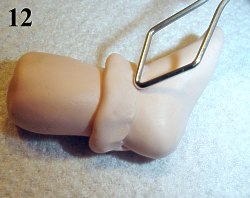 |
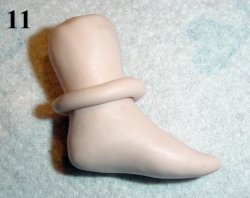
| Place the roll of fimo around the leg (pict. 11) and flatten it a little. Be careful not to flatten the top of the roll too much. You have to push the fimo roll a bit flat first, then smooth the part that links the leg to the foot, blend the seams using your fingers and/or a sculpting tool. (pict. 12) | |
 |
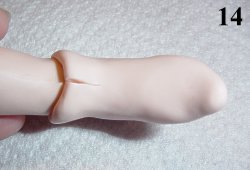 |
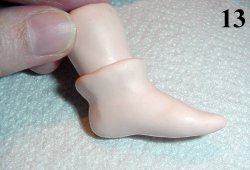
| Polishing the clay with a wet finger can do miracles. It will get much smoother and you can remove fingerprints. (pict.13). At the front you make a little incision with a knife (pict. 14). | |
 |
 |
|
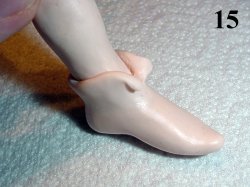
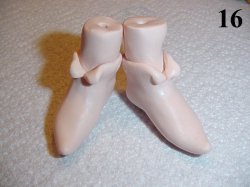
Now gently pull the clay open and sculpt it into two pointy flaps (pict. 15). Cut the leg off at about 1 inch above the boot. Make holes in the legs with a wooden "cocktail" stick, make sure it's deep enough. Twist the stick a little to make the holes wider. You can also fit the boots on the frame to be sure they will fit. Now the boots are finished. (pict. 16) |
|
The fimo has to be cured in a kitchen oven. Pre-heat the oven at 265 Fahrenheit, place the boots in the middle of the oven and bake for about 25 minutes. Let the boots cool off before taking them out of the oven! I always use a small wooden board with big nails through it, to place the boots on while curing. This way you don't get press marks on the boots of the oven plate. |
 |
 |
 |
|
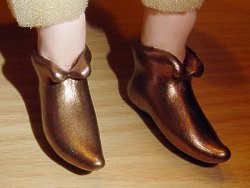
After cooling off you can paint the boots. The leg parts can be colored with thinned darkbrown oilpaint, to make the color a bit warmer. Put a little bit of paint on a piece of cloth and color the legs. Then rub it almost entirely clean with another cloth, there should be only a very thin layer of paint left. I painted the boots with a bronze acrylic paint. Metallic colors usually take a few layers before the color is right. I painted these boots 2 times. |
|