Tools
Materials
and tools I use. |
Clay
 |
|
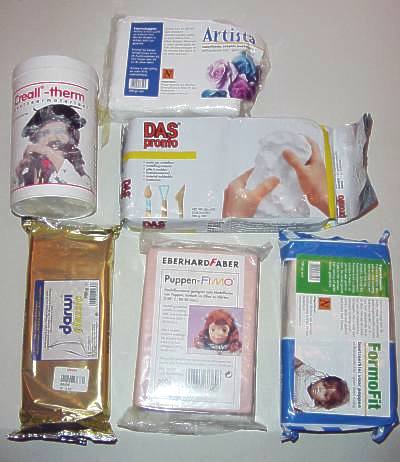
I use many kinds of clay. On this picture you see some of the brands I have at this moment. Puppen-Fimo and Creall-therm are polymer clay brands, you can cure them in a normal kitchen oven. The other clay brands are air drying clay. |
|
Puppen-Fimo is a firm clay but softer than fimo classic. You have to condition it well before you start. The fimo gets softer by the warmth of your hands. You can also use a kitchen machine to condition the clay faster. Because of the friction the fimo gets warm, this way you can condition the fimo easier. Puppenfimo has a new formula these days and new packaging (the one on the right). It's much softer than the original puppenfimo was. It works really great, it's still firm enough to hold it's shape well. A downside are the moonies (little white spots and 'half moons') that show up often after curing. |
 |
|
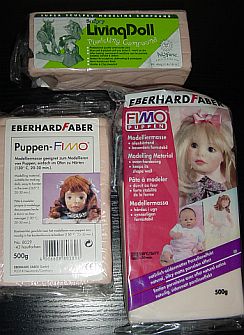
I never got moonies with the original puppenfimo. You can reduce the chance of moonies by mixing it with Sculpey Living Doll or with the older Fimo. Sculpey
LivingDoll is a polymer clay from America and finally available in The
Netherlands. It's a great clay, easy to knead. It can however become
very soft when working at it too long. A plus is it can be baked several
times, this gives you the possibility to sculpt in stages. Polymer clay is great for working in fine detail. Before baking you have to finish your sculptures as smooth as possible. It can be cured in a regular oven at 265 Fahrenheit, 20-30 minutes. The porcelain Puppen-Fimo should be cured at a maximum of 250 Fahrenheit, let it bake a little longer. Polymer clay still hardens after baking when cooling off, so do not touch it too soon! When it is cooled off you can immediately go on with your work, don't need to buff or sand but it is possible. |
|
 |
|
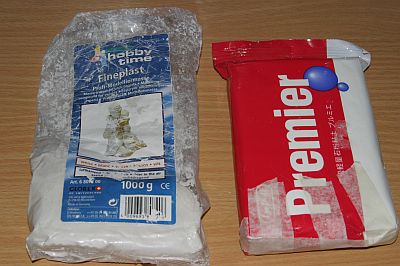
Premier is just one of the air-drying clays I use. It's soft and ready to use. After your sculpture air-dried, you can make it real smooth by sanding and buffing. It's a very strong clay. Another air-drying clay I like a lot is Hobbytime Fineplast, you need to add some water to make it softer. It will give you dirty hands, but a big plus...it's very easy to sand and buff, it gives a really smooth finish, best of all air-dry clays I tried. Before you can paint your sculptures of air-drying clay, you have to seal the clay with a primer/latex paint. Or else the paint gets sucked into the clay leaving a messy color. When using (diluted) latex paint as a primer, you can pour it over your sculptures. You will get a nice even layer on your work without brush strokes. Don't forget to place little pieces of paper on the eyes for protection. Instead of this technique you can also paint the clay with diluted skintone acrylicpaint about 7 times, be patient....it will become an even color in the end. After the paint
is dry you can buff the surface and paint it with oilpaint, watercolor
or acrylics. |
 |
|
For some projects I use Aves Apoxie Sculpt. This is an air-drying 2-compound 'polymer' clay. You have to mix 2 equal parts until it's an even color and you can sculpt for 1 to 3 hours with it before it gets too stiff. You can slow down the curing process by placing the mixed clay in the freezer. Apoxie sculpt is not an easy clay to work with, you need a lot of practice to get the hang of it, it is not comparable to normal polymer clays. The benefit of this clay is its strength and it is weather resistant, so you can use it outside. It is also a great material for making the armature stronger. As far as I know, the only two in The Netherlands who sell Apoxie Sculpt are Jac Bouten and Triskel Fantasy Shop. |
Tools
 |
|
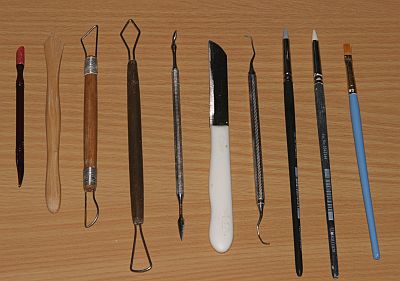
When sculpting I use mostly just my fingers and sometimes I use the tools on the picture above. The third and fourth tool from the left are called "mirettes", they are great sculpting tools and not expensive. The rubbertip brushes (second and third from the right) are also great sculpting tools for smoothing small areas that are hard to reach. The sculpting brush (on the right side) is very handy especially for sculpting with air-drying clay. You can smoothen the clay easily, especially difficult areas (around the eyes for instance). |
 |
| At the picture above you see a set of miniature "mirettes" for very small work. Wooden "cocktail" sticks are also very handy. |
Paint
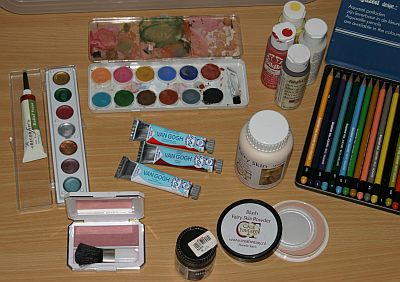 |
| There are different types of paint you can use, depending on the clay. Like acrylic paint, watercolor paint, thinned oilpaint, watercolor pencils, H2Oil (a water mixable oilpaint), patina (water- and oilbased), latex paint, rouge, make-up powder etc. |
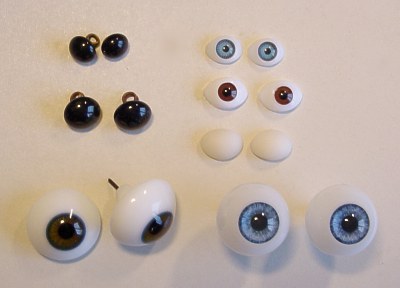
Eyes
 |
|
I use different types of eyes. It depends on the doll/figure I'm making and the clay I am using. For tall dolls I use glass eyes, because they are very life like. But usually I work with smaller sculptures, and for those figures I often use oval shaped plastic eyes. When using fimo, never put the head you're making aside for a couple of weeks because there can be a chemical reaction between soft fimo and plastic, the plastic will melt. So don't work too long at a head. One week is the maximum. When baking you have to lower the temperature a bit when using these eyes with your fimo figure. Let it cure a little longer at 215 Fahrenheit instead of 265. Always use an oven thermometer! Sometimes I use the round black glass eyes, you can paint them with acrylic paint. I always have some oval shaped fimo eyes in my collection. I use the colors porcelain or transparent for making these eyes and make them in different sizes. They are already cured when I use them. They can be used as normal eyes which you can paint when the head is cured, or you can use them for dolls with closed eyes. |
| But you can also make and paint the eyes first and place these in uncured heads. You can also use them in air drying clay. How you can make eyes yourself you can learn in this lesson...making eyes! |